
 Tutorial of YouTube FLV Downloader
Note: The below help article is for the Pro version of Moyea YouTube FLV Downloader. In fact, the way how to use the Moyea YouTube FLV Downloader is the same as its Pro version, the different between the two versions is that when converting the FLV to other video formats, Moyea YouTube FLV Downloader’s output files will be limited by watermark, while its Pro version will not have such limitation.
YouTube FLV Downloader Pro is more than a download tool. It is also a FLV library manager. With it, you can download online FLV/F4V from video-sharing websites like YouTube, Google Video, Fox etc., and then arrange it in its built-in library.
In addition, with its built-in FLV converter, you can convert any web videos (*.flv, *.f4v) to other formats like MP4, 3GP, AVI, MOV, MPG, MKV, FLV, MP3, MKA, WAV, AC3, M4A, etc., so that you can playback them on your iPhone, iPod, Blackberry, PSP, Zune, 3G mobile phones, or any other portable devices.
The below Help article will tell you how to use Moyea YouTube FLV Downloader Pro in three parts.
Part one: Installation
Part two: Getting Started
Part three: FAQ
Part one: Installation
1. System requirement:
- Windows XP/Vista
- Support Internet Explorer 5.0 and above
- Support FireFox
- Adobe Flash Player plugin, and DirectX 8.1 or above
- 128MB Memory (256MB recommended) 512MB hard disc space or above
- Windows compatible Monitor (800*600 or above resolution)
2. Install and uninstall
To install Moyea YouTube FLV Downloader Pro, just follow the steps below:
- Go to page http://www.flvsoft.com/youtube_flv_downloader_pro/ and download setup file youtube_flv_downloader_pro_setup.exe
- Double click on the setup file to begin installation.
- Follow the instructions to install Moyea YouTube FLV Downloader Pro on your PC.
To uninstall Moyea YouTube FLV Downloader Pro, you can do as the following two methods.
- Hit Windows Start and go through the following options: All Programs> Moyea> YouTube FLV Downloader Pro> Uninstall YouTube FLV Downloader Pro
- From Windows Start menu, select to open “Windows Control Panel”. Double click “Add or Remove Program”, scroll to “YouTube FLV Downloader Pro”, and click Remove.
Part two: Getting Started
After you install the Moyea YouTube FLV Downloader Pro, run it, the program will open in full screen mode along with a pop-up step by step tutorial.
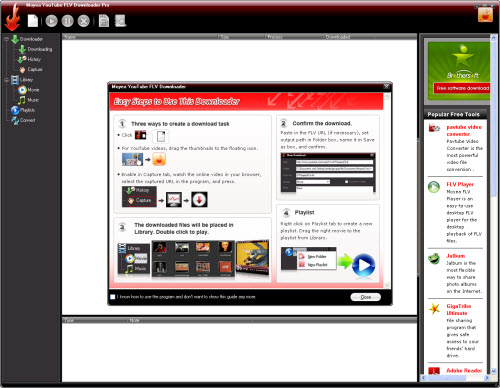
The simple tutorial will show you the easy steps to use this downloader, after you read it, just click the option “I know how to use the program and do not to show this guide any more”. Next time it won’t pop up together with the downloader.
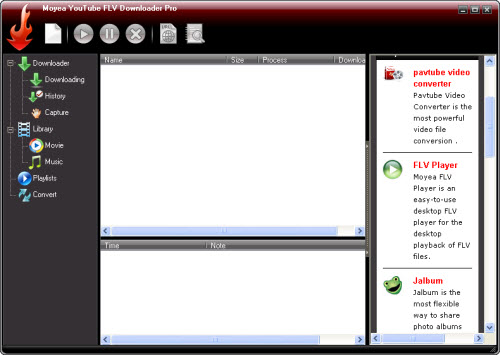
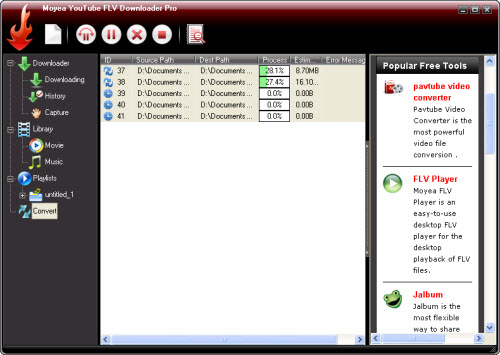
Meanwhile, on the left navigation column, you can see four parts: Downloader, Library, Playlist and Convert.
Downloader: Arrange downloading task.
Playlists: Create your own playlist via this powerful function. You can classify FLV files as you like, for instance, Rock music, hot movies, classic movies, pop music and more.
Library: Manage FLV files regardless of local FLV, converted files or downloaded FLV. You can import, play, browse and search FLV files on this library.
Convert: Click to present all the conversion tasks.
1. How to use its Downloader
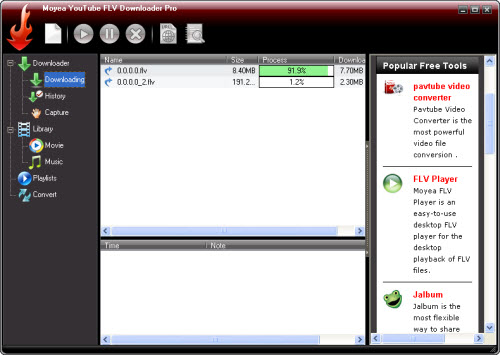
Downloader section contains three parts: Downloading, History, Capture. Here is the list for introduction of each button or menu. “Downloading” is for you to start a new start a new download; “History” contains all the downloaded FLV files in the list. You can know the name, size, complete time and the note, while “Capture” is to manage all the captured URLs. They will be listed in “Capture” ready for download. Of course you can shut down the function by clicking “Stop Hook” icon.
Downloading:
Choose Downloading, you will see its toolbar. 
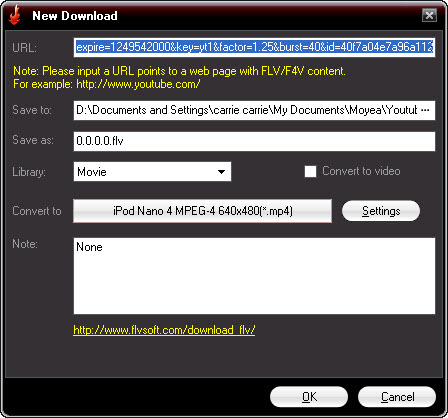
Click New button you can start to download a new FLV files from the video sharing website.
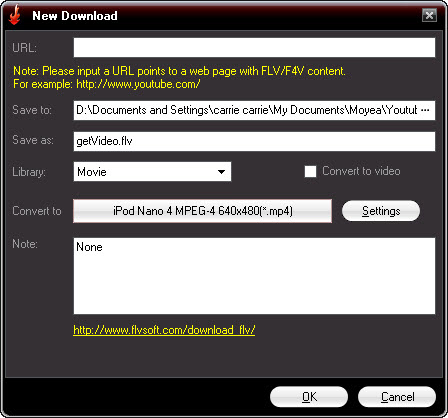
URL: Allow you to input the URL points to a web page with playing video.
Save to: Click “…” icon under the “Save to” box, you can determine where to save the downloaded FLV file.
Save as: You can rename the downloaded FLV file under the “Save as”, because the program will save the downloaded FLV file as the name of getVideo.flv by default.
Library: Choose where you want to save the download FLV in the library, movie or music?
Convert to video: check “Convert to video”, the program will download and convert the FLV at the same time.
Convert to: You can choose an output file format for converting the downloaded FLV
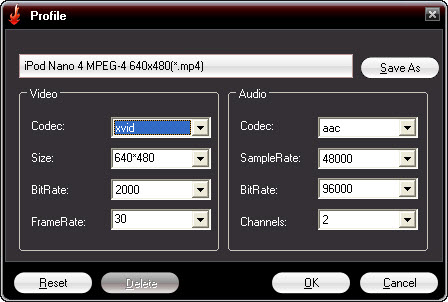
Settings: This settings section allows you set bit rate, frame rate, codec, and so on for the output formats.
When everything is set, click OK, the program will start to download the web video (*.flv, *.f4v).
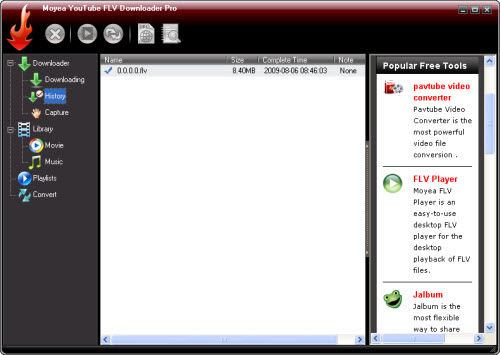
History:
The “History” contains all the downloaded FLV files in the list. You can know the name, size, complete time and the note.
Capture
Capture will show you all the captured URLs ready for download.
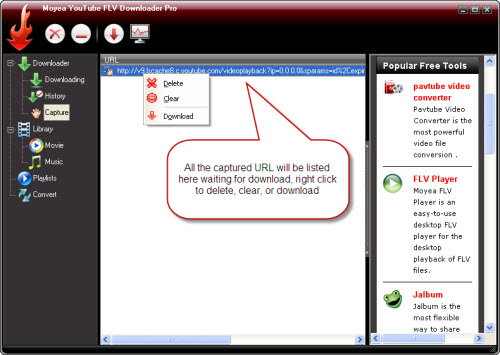
There are two ways for you to download the web video on that URL. 1. Right click the URL, you can choose to delete, clear, or download the web videos; 2. Click the tab directly on the toolbar, which show like below to delete, clear, or download.


Download icon.
![]()
Clear the captured URL.

Delete the captured URL.
 Stop hook icon.
The program can automatically “Capture” URL with playing videos ready for download. If you do not want it to capture URL automatically, just click “Stop hook” icon to shut down the function.
If you want to download the captured URL, click Download icon, the New Download window will pop up again.
Click OK; the program will start downloading at once.
2. How to use its Library
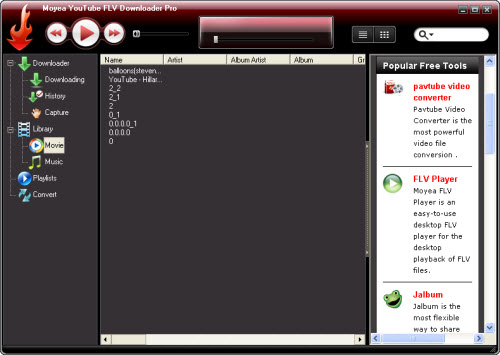
Library is the powerful video collection manager. It can organize and save the downloaded FLV files respectively in two tabs: “Movie” and “Music”. Right click on “Movie” or “Music” and you can choose to import FLV files from the local PC or open the library to view the saved FLV files.
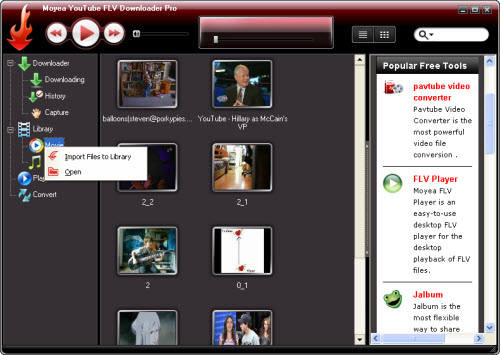
Select one FLV, use its toolbar like blow, you can play, adjust audio volume, search files, and view it in details or thumbnails.

Play: Click to pop up a float playback window for playing the selected video.
Previous: Click to skip to the previous movie or music.
Next: Click to skip to next movie or music.
Sound: Drag to adjust the volume.
Search: search the files in history list according to all or title.
 Thumbnails view: Present all the saved FLV/F4V files in thumbnails.
![]() Details view: This view way will show you the detailed information of the web videos.
Details view: This view way will show you the detailed information of the web videos.
Choose one FLV, Click “Play” button or double click the file. The playback window will pop up automatically and play the selected FLV video.
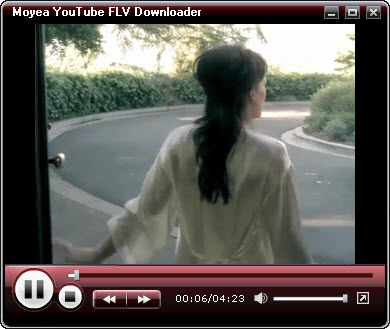
In playback window, you can do the following things:
- Drag to adjust the playback process.
- Drag and drop to make the playback screen larger or smaller.
- Click to play FLV videos in full screen.
- Adjust the volume by dragging and dropping.
- Skip to next or previous movie or music.
- Know the playing time point and the total time.
- Pause the video playback.
- Start playing the video.
Right click on the playback, you can see a screenshot like below: 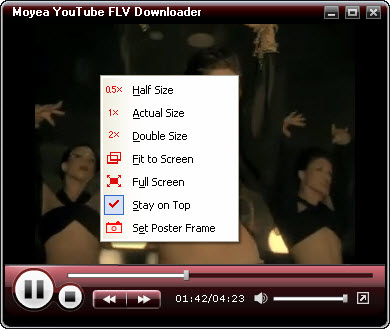
You can adjust the size of the playback window via these provided options: Half Size, Actual Size, Double Size, Fit to Screen and Full Screen. In addition, you can capture the current picture as the thumbnail to show via clicking “Set Poster Frame” and keep it always on top via selecting “Stay on Top”.
Tip: right click any FLV file; you will see a drop-down menu like below:
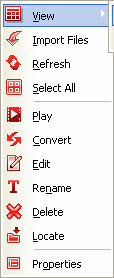
View: Present FLV files by two methods: Thumbnail and Details.
Import files: Input FLV files from your PC into the library.
Refresh: Refresh the current configured settings.
Select All: Select all the FLV in the collection.
Play: Play the selected FLV file in the float playback window.
Convert: Click it; the program will start a new conversion task.
Edit: Click it to run program FLV Editor Ultimate, if you have installed it on your PC.
Rename: Change FLV file’s original name to any name you like.
Delete: Delete the selected FLV files from library.
Locate: Open the folder containing specified FLV files on the PC.
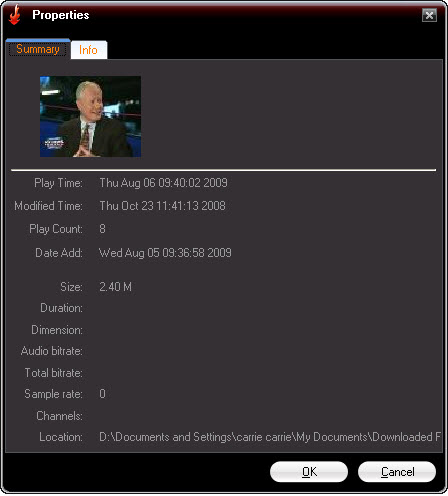
Properties: Click to pop up a window which lists all the information about the specified FLV file. See the following screenshot:
3. How to use its Playlist
In the playlist part, right click on the Playlist icon and you can create new folder and playlist.

Give a name to each playlist or folder, such as hot movies, pop music, or classic films, and then drag movies or music from the library to the specified playlist or folder, your personalized playlists will be made soon.
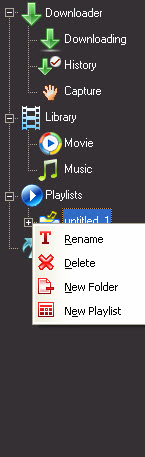
At the same time, right click any new folder or playlist, you can rename, delete, create new folder and playlist as you like.
4. How to use its Convert
In the Convert section, if you choose the web video in the library for conversion, you will see all the tasks are listed for conversion.
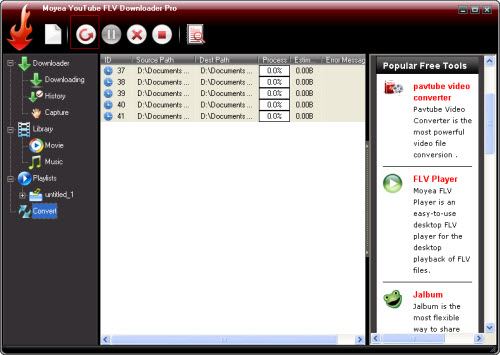
New: Click to add FLV files on your local computer to the conversion file list.
Start: Click to run the installed FLV to Video Converter Pro 2 on your PC to convert FLV.
Delete: Delete the selected video conversion task.
Locate: Click to open the target folder where the converted video files are saved on the computer.
Click “Start all tasks”  on the toolbar, the program will start to convert at once. When every conversion task is finished, the output folder will pop up.
If you want to start a new conversion for your web videos saved on your local PC, just click the fire button, choose New Convert.

The program will allow you to open the folder with FLV videos just like the below screenshot shows.
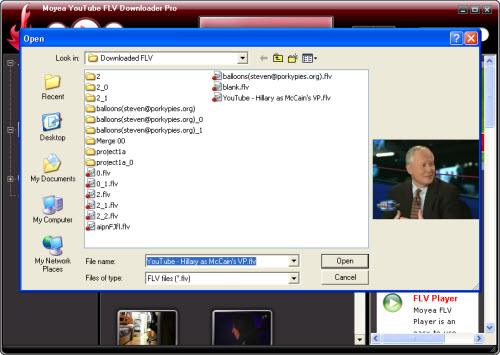
Select the one you want to convert, click Open, the New Convert window will pop up for you to start the convert task.

Part three: FAQ
1. How to download online FLV?
With this powerful download tool, you can choose one method to download FLV files from three easy methods: New task, capture URL and drag to the floating icon.
The first method to download: New task
Click “New Download” in downloading tab and you will see the pop-up window:
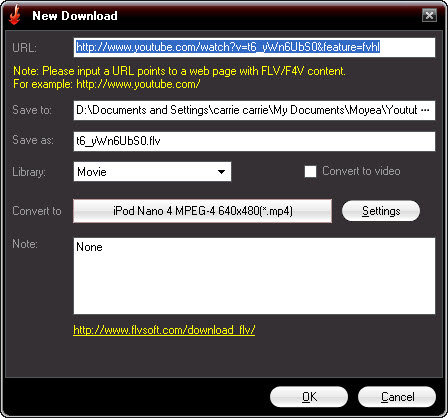
- Type in video URL into “URL” edit box.
- The video URL must be the URL of video playback in the address bar. For instance,
http://www.youtube.com/watch?v=1CPP12imM-I&feature=channel - Choose the type “Movie” or “Music”.
- The downloaded video file will be auto saved in “Movie” or “Music” in “Library”.
- Rename the FLV file, if you want.
- Check the option “Convert to video” to download and convert the FLV at the same time.
- Click “OK” and the download process begins.
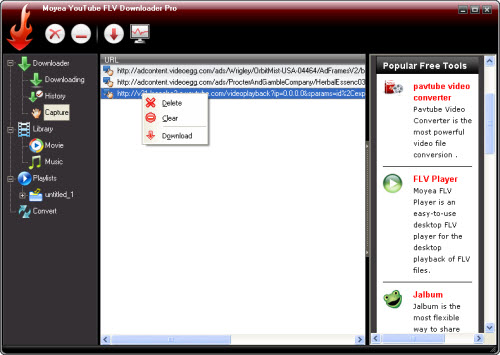
The second Method to download: Capture URL
The program will auto capture any playing web video’s web page URL on your browser. Click “Capture” tab and you will see all auto captured URLs are listed there. Select the URL you want to download and hit “Download” icon for downloading.
Note: Icon is to show you that the auto URL capture function is on. If you want to shut it down, just click the hook icon.
Soon, the download window will pop up. Just click “OK” to begin downloading.
The third method to download: drag to floating icon.
Once the program is launched, the floating icon will appear at the top the top-right corner of the desktop screen. 
- Launch the program and the floating icon will appear at the top-right corner of the screen.
- Open the video-sharing web site.
- Drag the thumbnail of the video listed on the web page to the floating icon.
- The New download window will pop up. Click “OK” to start downloading.

2. Where to find the downloaded FLV files
You can see the download information in the process of downloading. When the download process is finished, you can find the downloaded FLV file in three positions: the specified output folder in your PC, “History” tab and “Movie” or “Music” tab in “Library” of the program.
3. How to set the Preference
Click the fire icon of the program and the drop-down menu will pop up immediately. Choose “Preference”, you will see the following window. 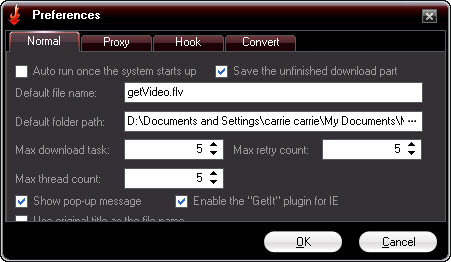
Normal
The program will name the FLV file to download as getVideo.flv by default in the box of “Default file name” if you do not rename it. You can freely change it to a new name you like. For output path, the program will save downloaded FLV file by default to C:Documents and SettingsAccount Name My DocumentsMoyeaYouTube FLV Downloader Pro. Alternatively you can click “…” icon to browse for choosing the location on your PC.
About download task, by default, the downloader will set max download task as five tasks. You can adjust the values according to your PC environment. “Max thread count” option allows you to configure how many threads to enable for converting a download task. The program by default is set as five threads. In addition, you can choose how many times to retry downloading FLV when it appears “Failed to download”.
Proxy
If you need to surf online with proxy settings, you can check the option: “Using proxy”. By default it is the uncheck state, not allowing being written. Check the option and you can configure the proxy. You need to type in the related information in five boxes. Choose the type of the proxy from the drop-down menu. Write address, port, and type in the username and password in the appreciated boxes. Then the proxy will be set successfully.
Hook
Check “Auto hook” to allow the program capture the URL points to a web page with playing videos automatically. By default, this option is checked.
Check “Hook all” to let the program auto capture playing FLV on all supported browsers. Uncheck to select none of them. If you want to enable the function on some browsers and not all, just uncheck the option: “Hook all” and specify the specific browsers. Then click “OK” to close the pop-up window.
Convert
This section allows you to set the max simultaneous conversion task from one to five. If you check the option “Allow multi-thread encoding” and “Allow separate thread encoding and decoding”, you are enjoy faster conversion speed. To show the conversion progress info, just check option “Display conversion progress info”.
