Video Converter for Mac
This program is an useful video and GIF converter, compressor, and editor on Mac OS which make it easy to enjoy home videos from DVs, camcorders (JVC, Panasonic, etc.), DVDs, and video-sharing websites (YouTube, Hulu) on portable devices with ease.Mac users who are looking for third-party program for their gadgets will be excited to find Moyea Video Converter for Mac. It helps people with little prior video experience to edit and convert high definition videos to any other popular formats they want on Mac OS. It highlights with its faster conversion speed, better output quality without audio and video sync problem, powerful editing functions and so on.
With it, you can edit different videos with a set of customization options, and then convert the video to the formats you want, so that you can backup the original videos on your computer; upload it to the websites or blogs for online sharing; play it on your portable devices like iPod, iPohone, Blackberry, various 3G mobile phones etc.
This guide will tell you how to use it with the following two parts:
Part one: Convert various video into other popular formats.
Part two: Edit video with a set of customization options.
OK, now, let’s go to the Part one firstly. Download and run the Moyea Video Converter for Mac, you will see an intuitive interface like below.

Press button Add  , you can import the video you want to convert. It supports almost all video formats including Flash Video/ YouTube video (*.flv, *.f4v), HD Video (*.tod, *.mod, *.m2t, *.m2ts, *.ts, *.tp, *.evo, *.mkv, *.dv), General Video (AVI, MPEG, WAV, etc.) and so on.
If you do not need to edit the original file and want to convert it directly, you can choose the output file format directly from the drop-down menu of Format and then press the convert button  to start the conversion.

After you press the convert button , you will see the conversion progress info show like the total conversion progress, generated size, estimated size, time elapse and estimated left time etc.
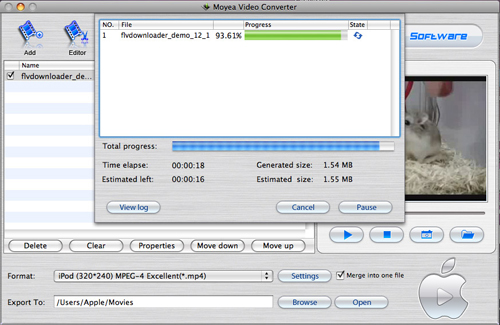
Soon, the conversion will be finished. Press the button Open, you can get the output file and enjoy it in any way you like, such as transfer it to your iPod, iPhone, Blackberry, or just backup on your computer.
Part two: Edit video with a set of customization options.
If you want to personalize your video before the conversion, you can also do it easily with Moyea Video Converter for Mac.
Click , you will see the editing window below. The original preview and output preview will be convenient for you to compare the original video and converted video effects. Under the Editor section, you can trim, crop, add watermark and effect, replace audio, and even flip video vertically and horizontally.
- Trim video
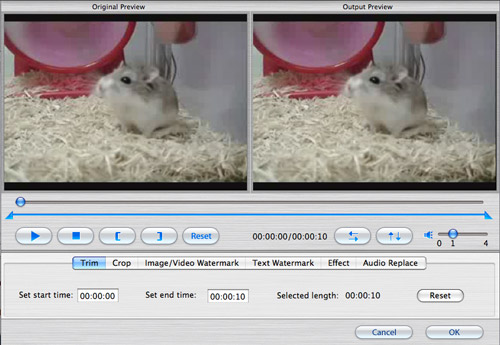
To trim the original video, you can get the specific video length. Set the start time and end time under the trim section, or simply drag the timeline below the previews windows to select the video length. If that is not you want, you can click button Reset to trim again.
There are three ways available for you to trim the video:
1, Drag the slider bars
Drag ![]() below the preview window to mark the beginning of your clip and drag
below the preview window to mark the beginning of your clip and drag ![]() to mark the end of your clip during the preview.
to mark the end of your clip during the preview.
2, Control mark buttons
Press the button ![]() to mark the start time of your clip and
to mark the start time of your clip and ![]() to mark the end of your clip during the preview.
to mark the end of your clip during the preview.
3, Enter the values
Input the certain time number in Set start time and Set end time fields.
- Crop video
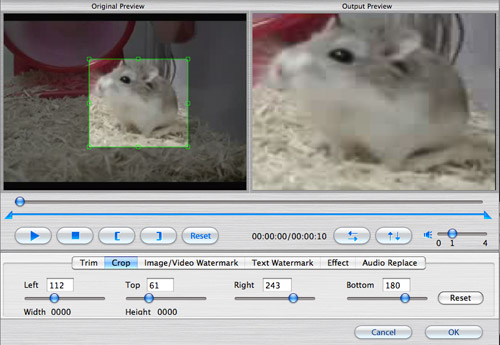
With Crop, you can cut off the black edges or any unwanted area, just like the above interface show.
There are two ways for you to crop video.
1, Crop by adjusting the crop frame
The cropping frame is a dashed line around the video. There are eight small adjusting boxes on the crop frame. Each adjusting box allows you to crop the video from a different position. You can movie your mouse cursor onto an adjusting box and drag the dashed frame.
2, Crop by set the values and dragging the slider bars
There are four crop values: Left, Top, Right and Button. You can input value to crop your video or just drag the four slider bars below the boxes to do the cropping.
- Add watermark
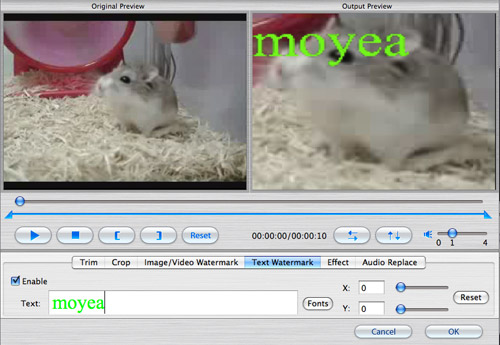
The program allows you to add different watermark to protect your copyright avoiding illegal copying or personalize your video to meet your other special needs. With its watermark functionality, you can add video watermark, image watermark and text watermark.
- Image/Video watermark: Enable the image/video watermark function; you can select a picture or video from your PC as a watermark to the video. Besides the still image like jpg, png, it also supports to add animated image format GIF. Meanwhile, its video watermark can naturally be displayed in the video to perfectly show a picture-in-picture effect. VP6 alpha video is also supported here. In addition, you can edit the image watermark by setting the position, heights and width.
- Text Watermark: This section allows you to input the text watermark to the video. What’s more, you can edit the text with different font, color and size.
4) Flip video vertically and horizontally.
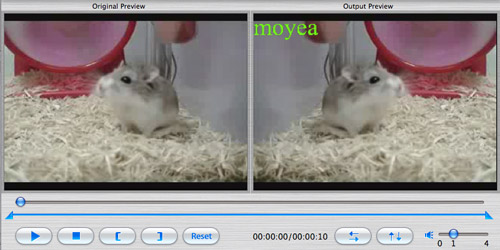
Button![]() is for you to flip video vertically. See the mouse in the above preview windows; it shows the effect after clicking the vertical flip button.
is for you to flip video vertically. See the mouse in the above preview windows; it shows the effect after clicking the vertical flip button.
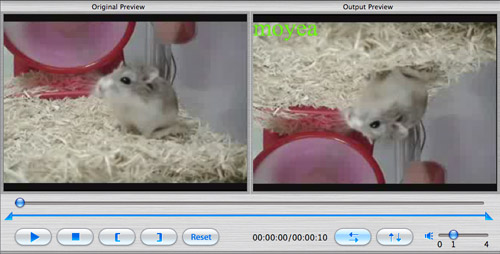
Conversely, button![]() is designed for you to let the selected video flip horizontally.
is designed for you to let the selected video flip horizontally.
- Special effects:
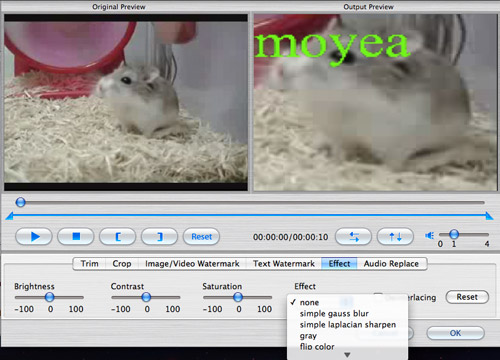
This program enables you to set the advanced effect of the output video to customize your original video. According to your need, you can change the video brightness, contrast, saturation, volume as well as adding special effects: Simple gauss blur (remove image noise), Simple laplacian sharpen (sharpen the color), Aged film (make old yellow effect), Gray, Flip color, Invert, etc.
- Audio replacement:

Click “Audio Replace” button, check “Enable audio replace” option, and then select the audio file you wan to add by clicking the browse button.
With the above six editing sections, you will be able to make a stunning video for conversion even though you do not have any editing experience.
 Promotion


